Rosa's World

Tuesday, July 27, 2010

Another UFO done!

Hi There!

Well, yes, it IS a panel, yet Gilbert longarmed it and it's a gifty to one of my sisters.... And YES, I finally finished the binding and I've added a label, on the back.

Soooo, in my books,
it's no longer a UFO
(Un-Finished Object), but a
FO (Finished Object)!


This was finished on Sunday afternoon.

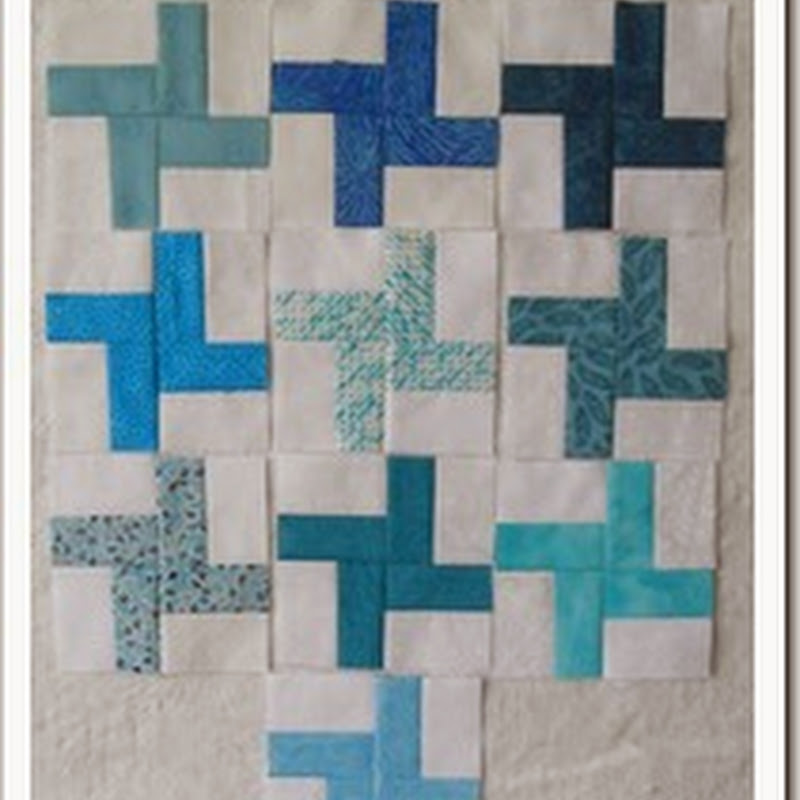
And Sunday, I also managed to finish this block 'cept for the last strip.

A-1 - Pinwheel Gone Awry
(28 pieces)


Yesterday, Monday, right after work, I went into my sewing room and finished that block and managed to finish this cute little pink one, too!

A-2 = One Two Buckle My Shoe
(40 pieces) !!!


Imagine? this 4-1/2 inch block has FORTY pieces?!?!? Some complete, FULL SIZED quilts don't even have that many pieces, in it's entirety!

What's on my Design Wall, now?

Well, this evening, I dug out my crumb blocks and put them up on my wall. Funny how I just LOVE making those blocks, but HATE piecing them all together, eh?

I think it might be the setting that I selected for them - "on point".
*shudder*

Anyhow, I'll finish it off and Gilbert will longarm it, for me and it'll be finished.... but, I'm not there, yet.

*s*

And, tomorrow's Wednesday - E & J Day!

Have a great Wednesday!

Rosa


Sunday, July 25, 2010

Let Me Introduce Hunter's Moon

Hi there!

When I did my first Dear Jane quilt, I had the hardest time with this block:
A-3 = Hunter's Moon.

This one became one of my bloopers.

Gilbert even tried to stretch it in the opposite direction and it STILL didn't come out "round"!

LOL


My 2nd and final attempt came out a bit better. This one is in my first DJ quilt.


As you all know, I'm making a SECOND Dear Jane quilt in polka dots. And you might call this cheating or being lazy, or whatever... I really don't give a hoot on this - I machine appliqued this one, but OH MY GOD, I think it turned out almost perfect.... for me, anyhow!

LOL


(Rosemary - recognize the fabric?!??! *grin*)

This morning, I decided to start and finish the BOM (Block Of the Month) that I've signed up for, at our local quilt shop.

Here's a shot of all the BOM's that I've done, so far...


And here's this month's:


I just LOVE these soft pastel colours!

Have a GREAT week!

Rosa

2 Rights DO Make a Wrong!

Hi There!

Well, yesterday afternoon, I took a break from our quilt show preparations - "bindings" and form registrations and nail bitings - and decided to AT LEAST do this week's Dear Jane BOW (Block Of the Week), right?

Well, here's this week's BOW:

L-9 = Walter's Place


And then, because I screwed up and first traced THIS one instead of the the BOW, and AFTER I re-traced the correct BOW and pieced it together, I decided to do this one, anyhow!

L-11 = Caitlin's Rose


And since we've reached our 4 week mark on these BOWs, our BOW mistress also gave us a TOW (Triangle Of the Week) to do, if we were so inclined.

*grin*

Well, as you can see, one of the black strips on the right is kinda top-heavy, which really wouldn't be a problem for me, right? I'm not THAT fussy... LOL

But, I missed a WHITE center strip - that's why you have 2 black strips, side by side.

HEY!!! You know what?!?!?

Last evening, I was too discouraged and tired to think about this, but I'm re-looking at this one and I'm guessing that I can rip out pieces here and there and re-do that center part.


Hmmmm.... might just do that this morning, even!

*VBG*

We'll keep you posted!

Have a great Sunday!

Rosa
(where it's raining - QUILTING WEATHER!!!!)


Wednesday, July 21, 2010

ATTENTION - All FFF (Fabulous Fall Frolic) Swappers!!!

Hi There!

Here's my second quilt, that I will be submitting for our local quilt show, in September.

I found instructions on the web, on how to make a quilt sleeve.


And hey...

GUESS WHAT?!?!?!

All those of you that swapped FFF (Fabulous Fall Frolic) blocks, you're ALL invited to come along!!!!


Each and every one of you helped me with this quilt!

*VBG*


Keep your fingers crossed - we may just win something!

Rosa

Monday, July 19, 2010

Yard Sales 'n Stars!!!

Hi There!

Last Saturday, Gilbert found a couple yard sales,
on our way to do errands.

I wasn't too keen on going,
but am desperate to find a "rug hooking cutter",
and at $200 (plus), it's kinda out of my budget range,
at this moment.... and, silly me,
I'm hoping that someone will have one of these cutters,
at their yard sale for 2 bucks!
Yep - wishful thinking, but ya never know, eh?
*grin*

Anyhow, saw this candy jar, on a table for 3 bucks.

I NEVER haggle, but this time I offered 2 bucks
and the (nice) lady agreed.
SOLD!

Gilbert cleaned it up for me
and, once dried, I quickly filled it up
with my red, burgundy and pink threads!


(Don't cha just LOVE "Ordinary Stuff" that can be converted into "Sewing Stuff"?!??)

In the meantime, that day, we stopped at "Bulk Barn" and I spied a smaller candy jar! I figured that I'd use the smaller one in my home office... for when I'm hand piecing or appliquing, or whatever. And the 2nd one - oh YES, I got a 2nd one - could be used to put my thimbles in it!

*grin*

What's on my design wall, these days, you ask?

Well, as you can see, I've been busy making more "stars"!

WARNING: These CAN and WILL BE addictive!


Well, I started piecing them together, as per the magazine's instructions.

I nearly finished 1 complete row.
There's another blue diamond and yet another star required, at the end of this row (right side).


And here's a close up of these stars.
See the tumbling blocks?!?
Cool, eh?!??!?


This pattern's from "American Patchwork and Quilting", June 2010 issue.

It's starts on page 88 and it's called "Honeycomb Stars", designed by Cindy Blackberg, but I'm told that the dark blue fabric is from the Jo Morton line and my friend Elaine sent me the EXACT SAME blue fabric -
how awesome is that, eh?!?!??!?

Also, we're a small group of buddettes that swapped
(Civil War fabrics) diamonds, printed on Inklingo....

That's how I managed to get so many
DIFFERENT colored CW diamonds!

Well, I'm off to bed soon.

Have a great Tuesday!!!

Rosa

Fat Quarter Stash Ladies

Hi There!

Well, here's my first FINISHED piece,
for the upcoming quilt show.

Of course, Gilbert is the one that
quilted this wallhanging,
with "Bertha".


Since the back is just as cute as the front,
I didn't want to put a sleeve, on the back.

I asked Gilbert to cut me up a piece of dowel,
and could he add something "cute" at each end?

I went to work and Gilbert started digging
into my sewing containers and
found two empty wooden spools.
He then glued the wooden spools
onto the dowel.


He went and gave them several coats
of white spray paint and VOILA!!!

*grin*


This kit was one of my gifties
from my DJ Secret Sister - Jo Spindle!


She gave me this kit about 3 or 4 years ago.


Doesn't it look better, on the clothesline?!??!

Thanks Jo!

Rosa
P.S. DARN!!!! I just realized that I didn't take a picture of the back of this wall hanging - it is rather comical! Will have to try and remember to do that.

Sunday, July 18, 2010

Which Came First?

Hi There!

Trust me -
You gals 'n guys are TRULY gonna be sick 'n tired of reading about my Dear Jane, by the time it's all said and done!

LOL

Final registration deadline, for the
"Kennebecasis Valley Quilting Guild's 30th Annual Show and Sale",
is the 20th of August.

Quilt show:
Starts - Thursday, 16th of September 2010.
Ends - Saturday, 18th of September 2010.

Soooo, I'm guessing that I'll stop blogging about this quilt,
on the 19th of September.
*VBG*

Friday evening, as soon as I got home, Gilbert and I sat down with my DJ and started "brushing" out the pencil marks, on the scallops, with the Magic Recipe. I've nicknamed it the Magic Recipe 'cause I honestly didn't believe it would work and it did!!!
*VBG*

Here's the recipe, given to me by someone on the Dear Jane forum.... Sorry, can't remember your name. *s*

*********************

Pencil Marks Removal Recipe:
1/4 cup of water
3/4 cup of rubbing alcohol
7 - 8 of Palmolive liquid detergent

Mix and apply with a toothbrush.

*********************

Gilbert hung the quilt on our clothesline.
We needed to let the scallops dry.


Gilbert's looking on and admiring his quilting.
I'm looking on and admiring my piecing skills
and thinking that, never in my WILDEST dreams,
did I EVER expect to see a DJ on my clothesline -
even though it's not binded!

Which came first, the chicken or the egg?!?!?

LOL

In other words, who's work is more important?


Neither.

Or course, you need the person to PIECE the quilt together,
yet you don't have a "finished" product until someone "quilts" it together, right?

*grin*

Well, I think we did incredible team work and whether we win a ribbon or whatever, these submitted quilts will have done several things, in my eyes.

Get my butt into gear, FINISH these quilts, given me the courage to step forward and SUBMIT them to be juried and viewed in front of others and most importantly of all.... get some FREE publicity, for our slow growing business. Slow growing because we're in the middle of summer and most quilters take the summer off and the fact that the quality of our work is still somewhat unknown.

Anyhow, Saturday afternoon, Gilbert created another template to draw OUTSIDE of the quilted scallops and FINALLY cut off the extra fabric, so that we see the scallops, themselves.

And while Gilbert was in the drawing and cutting mood, he also cut out bigger scallops on "My Pink Quilt" - OH MY!!!

What an INCREDIBLE difference scallops make!
*VBG*

Pictures will be uploaded to my blog, once the bindings to these 2 quilts are finished.

Rosa

Wednesday, July 14, 2010

And 3 More Dots!!!

Hi there!

And 3 more polka dot blocks got done!

A-4 = Courtney's Stethoscope


A-10 = Which Points West?


C-9 = Jane's Tears


I'll have to put these cute little blocks aside,
for a bit.

I need to concentrate REAL HARD
on finishing some quilts that I
want to enter into one of our
local quilt shows.

I've never done that before and
I'm a bit anxious on following
all the rules and such.

I'll be posting pictures
of my finished quilts,
ASAP!

Wish me luck!

Rosa

Tuesday, July 13, 2010

My Organized "Jane"

Hi There!

Okay, here are some of the things that I am doing,
for my second Dear Jane....

I photocopied the "chart",
from the DJ book and
Gilbert glued it on some card board.

I then cut out little pieces of fabrics,
from each block that I've done...
Gives me an idea on the color scheme.

It also encourages me,
as I see my chart fill out!


This only proved to me that I would HATE scrapbooking, when I did my FIRST Dear Jane.... but here I am, doing a second one and YES, I'm doing yet ANOTHER journal to go with this one!

Glutton for punishment!
*VBG*


And, I have a 3 ring binder,
that I've added transparent "pockets" or sleeves.
I add my journal page and my block, also.

Blocks will come out, when it's time to be pieced together.


Sunday, I did this block
and since my first DJ was still in the longarm frame,
I took a picture of both of them.


Here's a close-up of my block,
that I machine applique'd.


Off to bed... g'nite!

Rosa

Sunday, July 11, 2010

Quilt Binding 101

Hi There!

Remember I told you that Janet, one of our quilting clients, had explained to me how to bind your quilt, BOTH SIDES, with your sewing machine.

So, here's MY opinion, okay?

If you're making a heirloom quilt or hoping to submit your quilt in a quilt show, you may not want to sew your binding this way.

But if you're making place mats, or a quilt for your neighbor's mailman's cousin's daughter and your name isn't going on the label, AND you're pressed for time, you might to consider this technique.

*grin*

Here's a quick tutorial for you.

Like everything else, practice DOES make perfect - or almost - and lately I've had an AWFUL lot of place mats and baby quilts to practice on!

Cut and iron your binding like you normally would - you know? At 2-1/2 inch, right?

Now, when you FIRST sew it, it's best to sew on the UNDERNEATH of the quilt... the OPPOSITE of what you normally would have done, right?
(I'll explain why, later)


Sew your corners down, like you normally would.
(please ignore the dust)


The Zipper Foot is my friend!!!!

Imagine? I've got all these different kind of "feet", with my sewing machine and my friend pointed out the Zipper Foot, and explained what I could do with it!

WOW!!!!! I LOVE THIS FOOT!!!

Anyhow, here's what you do:

Put on your Zipper Foot.

Align your needle to 1/4".

Flip your place mat over.

See the sew line from the binding, that you just sewed? Well, fold over the binding, line up the folded edge of your binding and try to line it up with the previous sewn line.

Okay... thread color... I forgot to mention that.

Top thread should match the color of the binding.

Bobbin thread should match the color of the binding, also.

Butt up your Zipper Foot to the edge of the binding and VOILA!


You might want to use pins to line up the edge of the binding to just a teeny, weeny over the previous sewn line... I just eye-ball it and go fairly slow.... re-aligning my binding every 2 or 3 inches.


Your corners are done exactly the same way as when you sew the binding on, by hand.

I found it very helpful to pin the edges down.


And here's the final results!

You can click on any of these pictures
to see a close-up


And another picture of Gilbert's magnificent (IMHO) work!
*VBG*


See why I suggest that you first sew on the binding to the BOTTOM part, first? So that, when you sew the OTHER side... which is now the TOP of the quilt... you want it to look nice.


Hope this helps! And if you have any place mats or non-heirloom quilts, give it a try!

Rosa

And Yet Another UFO Sighting!!

Hi There!

Okay, I TOLD YOU that I would be sewing this weekend and avoiding, as best as possible, any housework... didn't I?!?!?

LOL

Two loads of laundry got done, late this afternoon and let's just say that I've got a LOT of dishes wanting for some quality time with me. LOL

They'll just have to wait till tomorrow evening.

*grin*

These two lovely, bright yellow pieces of fabrics were picked up, while I was on a business trip, up the north of my province.... 'bout 2 or 3 years ago.

Didn't know what I wanted to do with me and with Gilbert and Bertha doing their "thing", I decided to get them sandwiched together - my two pieces of fabric, that is... and let Gilbert and Bertha work their magic on it.


It was finished like... maybe a month ago.
I FINALLY got it bound yesterday.


Some lucky child will have a nice, colorful quilt.

Rosa

We Have Progress....

Well, as of late this afternoon,
"Operation Jane" is no longer on the longarm -

We DO have progress!

Here's a few pics:
J-5 = John Jacob's Windmill


I-6 = Viewer's Choice


G-5 = Poof!


Here's a quick picture of the back....


And finally, "Operation Jane" was
slackened, un-pinned and taken off the frame.


Gilbert and I will be erasing a few pencil marks,
that were required for the scallops....
Then, Gilbert, will cut around these scallops
and I will do it's binding.

A double edged sward.... joy yet sadness.
This wonderous Dear Jane voyage was coming to an end...

Started my Dear Jane on
the 5th of June, 2005.

Okay, I took 2 years off - I didn't do a THING with her,
but I can now say she's quilted, thanks to Gilbert and "Bertha"!

*VBG*

Rosa

2 (and a half) UFO Sightings!!!

Hi There!

Well, after doing 3 or 4 quilts, Gilbert told me that he needed a wrist pincushion, like the lady in the video. I understood who he was referring to, but in case you're wondering, he was referring to Linda V. Taylor, on the Gammill website. There's a few videos on their site, that show you how to load your quilt, how to quilt, etc, etc.

Well, we looked HIGH and LOW, on the internet to find a wrist pincushion that he felt would be useful for him. Couldn't find one.

Found some guy selling some on Ebay. Gilbert wrote to him, asking what the dimensions of the pincushion were and got no reply. After 3 or 4 days, he re-wrote to him, with the same question.
His reply? "They're the same dimensions as the others."

WTF?!??!
*scratching our heads*
Anyhow, needless to say, Gilbert put him on his "Ignore" list.
You've GOT to be a special kind of stupid to send off a reply like that!
LOL

Sooooo, as usual, when we can find what we're looking for, we put our collective and creative heads together, have a family meeting, come up with a game plan or design and just MAKE IT OURSELVES!

He wanted something black, easy to slip on and off and with velcro... something similar to the what they used in "that video".


Works for him and he's now a happy camper,
or should I write....
"Happy Quilter"?
LOL


My friend Elaine had sent me, this spring, several boxes of INCREDIBLY BEAUTIFUL fabric and inside 1 of these boxes were 2 panels of lovely Victorian tea themed fabrics.

This panel SCREAMED place mats!!!

I had to fussy cut and build around each piece. I decided to add a heart block, from a previous swap that I had done. Soooo, if you see your "heart" block here, trust me - it looks GORGEOUS!!!


Made 6 of these place mats:
2 for my Mom
2 for my Mom's friend, Eva
and
2 for my Aunt Marcie.

I told them that these were fancy smancy place mats...
to be used when they had tea, with their special friend. *s*

(NOTE: Thanks Elaine, for these gorgeous fabrics!!!)


Two weeks ago, Gilbert's daughter wrote to him, asking if we could make a baby quilt for her friend and that she was prepared to pay for it.

I told Gilbert that (once again), Elaine had sent me a box FULL of American Jane fabrics and I had picked up a pattern specifically for that fabric line and it would be a SNAP to make one!


Well, this quilt top took me Saturday and Sunday to make... only because I made a mistake, which got compounded by trying to continue on with the quilt, instead of ripping out my mistake and fixing it, right away....

This quilt should NOT have taken more than a day!

*long sigh*

Story of my life!
LOL


The "top" is now finished. That's why I'm calling this UFO a "half" one.

Gilbert's almost finished longarming my first Dear Jane quilt.

After that, I believe, he'll be doing up this one.

*VBG*

It's now 7h06 a.m. and I'm heading downstairs to work on some more polka dotted Dear Jane blocks, for my second quilt!

Have a great Sunday!!!

Rosa